Io Progress Report - Pre-Alpha
16 Feb 2020
At a Glance
This sprint I spent a lot of time getting familiar with the repo and learning how the existing scripts interacted with each other. This was my first time working on such a large game project with so many people. I was tasked with implementing the following features:
- Enemy Aggro
- Created interface for triggering events when a player enters an enemy’s range
- Shielding Enemy Prototype
- Implemented a shield which deflects the player’s teleportation projectile
- Made several variants on this concept so we could playtest them
Enemy Aggro
When the player gets close to an enemy, functions must be called that change the enemy’s behavior. Since there aren’t any finalized enemy concepts at this point, I worked on a generic and flexible script that could be applied to all future enemies. In my past experience with game jams and EECS 494 projects, the priority was in making it work quickly, which resulted in “hacky” code. For this project, I had to make sure that my scripts could be used by other people without much modification.
To achieve this, I learned how to use UnityEvents. This provides an easily accesible interface to use in the editor and now all I can think of is how useful these would have been in past projects rather than using delegates at runtime. Also, I found out about editor attributes like Tooltip and Header. I’ve never had to use these in my projects but they seemed useful when making components other people would use.
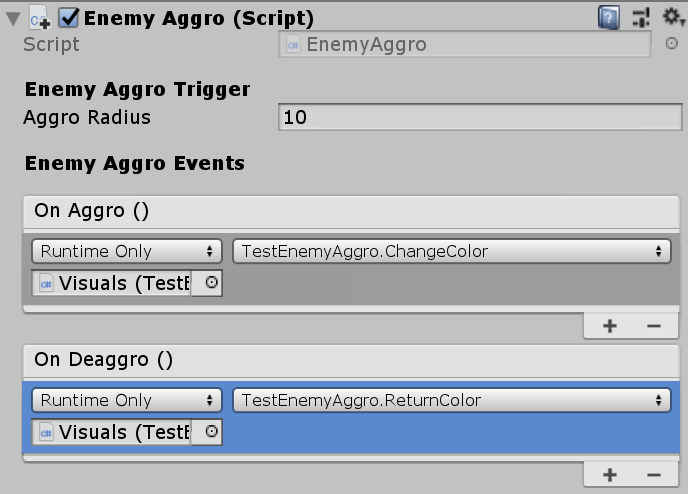
The use of Headers, Tooltips, and public UnityEvents provide a clear interface for users of the component.
I tried out two approaches for deciding when the player enters and exits the range of an enemy. My first thought was to calculate an enemy’s distance to the player on each frame. A private boolean inRange could be set appropriately to track state. This worked, but I quickly realized there would be problems scaling up this solution. First, each enemy would need a reference to the player. Performing a name search in Start is a hacky solution that would break if the name changed, and manually dragging the player GameObject to every enemy in the editor is messy and inefficient. The in-editor references would have to be set in every new scene as well. Second, every enemy would be independently accessing the player’s transform and calculating the player’s distance each frame which may not be performant.
I decided to use the built-in functions OnTriggerEnter2D and OnTriggerExit2D. The aggro range could be set as the radius of the trigger. This turned out to be a more elegant solution. My first attempt added the CircleCollider at runtime. However, during code review, Max suggested I use RequireComponent instead. I think the biggest problem with the initial solution is that it adds some obfuscation to how the code works when you look at the editor. Since the collider is added at runtime, it doesn’t show up in the editor. If someone added a CircleCollider2D component for another purpose, it would conflict with mine and it would be very hard for them to debug and figure out where it’s being modified.
The enemies change color when a player enters their aggro range (green).
I tested the component by interfacing with the public UnityEvents I made available in the script. I decided on just changing the enemy’s color since this wouldn’t need any additional components and would make it clearly obvious if it was working. Also, the enemy’s visuals are defined in a child GameObject of the parent Enemy, so this would show that functions on other GameObjects can be invoked by the events. When the player enters the enemy’s aggro range, they turn blue. When they exit, they turn red.
Shielding Enemy Prototype
I created several variants of a shielding enemy. It’s not clear whether these will be used in the final game, but the prototypes will help us determine which mechanics are interesting or engaging enough to take further. The first shield variant reflects the player’s teleportation projectile at the same angle it hits the shield. The shield is just a BoxCollider and when it collides with the projectile, it computes the angle from where the player sent it, and just negates this direction vector.
The player's projectile is fired back at them when it hits the shield.
I thought this one could be used for a boss battle or environmental hazard where a large vertical shield is used. However, the reflection wasn’t very realistic and since it just sent you backwards, it didn’t seem like it would be useful for platforming. The second variant was similar, but instead of just negating the directional vector, it reflected it along the shield’s normal vector. It took some experimentation to make sure I had the correct normals for all possible shield angles (it ended up being the shield’s transform.right vector).
The player's projectile is reflected by a shield. It appears to carry its momentum rather than coming back to the player.
I still had time to log so I decided to attempt a third variant that lets the player’s projectile pass through the shield but actually reflects the player when they try to teleport through. This ended up causing a lot of problems. Currently, the player instantly teleports to the projectile when the right trigger is lifted up. In order to change this behavior, I would have to edit the actual CharacterController2D script used in the production build of the game. Up until this point, I was only making and modifying scripts in the _Development folder. I foolishly decided to make these changes in the same branch I had made my other shielding enemy variants. I ended up having to dig into some git documentation to figure out how to undo my changes (which I even more foolishly decided to commit and push). For future reference, it’s git revert. Also branch before you revert so you don’t have to checkout an old commit and branch from there.
The player is reflected by a shield as they try to teleport through.
I ended up making minimal changes to the CharacterController2D script by adding a UnityEvent to the HandleTeleportationProjectile function. This allowed me to add the bouncing functionality from the shield component without breaking existing functionality. As it stands, it’s more of a proof of concept. The shield stores the location where the projectile hit it, and then adds a listener to the UnityEvent on the player controller. This listener teleports the player to this saved position and adds some velocity to their rigidbody. It uses the same reflection along the shield’s normal as the previous variant.
What I Learned
These past two weeks definitely had some growing pains, but I learned a lot of things that will help me become more efficient at contributing to the project later on. I read up on UnityEvents, editor attributes, and our Unity style guide to improve the readability and maintainability of the components I created. I ended up reading a lot of other people’s code too. In 494, my partners’ code was more like a black box and only they knew how it worked. I had some git troubles as well, but now I’ll be smarter about handling them in the future.